Backing up and Restoring Large WordPress Databases
If you have a large WordPress database, it may be difficult to backup and restore your website data. Jérémy Heleine gives us solution. Jérémy is a passionate guy who is interested in many fields, particularly in the high tech world for which he covers the news everyday on some blogs, and web development which takes much of his free time. He loves learning new things and sharing his knowledge with others. Original article is from sitepoint.com. SitePoint is a hub for web developers to share their passion for building incredible Internet things. It founded by Mark Harbottle and Matt Mickiewicz in 1999. Image courtesy of HD_Premium_shots via Bigstockphoto.
In this article, I’ll cover how to restore big database dumps with a useful tool called BigDump. Essentially, BigDump is a PHP script that allows you to import a database dump as big as you want, even if your upload limit is low. This article assumes that you don’t have SSH/command line access to your server, or are more comfortable using a web application. Note that BigDump is released under the GNU GPL 2 license.
After restoring a big database dump with BigDump, I’ll show you how to automatically generate these dumps thanks to a WordPress plugin named WP-DBManager, because you don’t have time to waste manually backing up your database every day!
Generating a BigDump-ready Database Dump
I’ve already covered how to back up a WordPress database in the previous article, so we won’t describe how to do that again. However, there’s something you should know if you want to use BigDump.
In practice, BigDump splits your file into as many files as necessary for your server to allow the import, and sometimes the split can cause trouble – if you use extended inserts that allow you to optimize your SQL queries by merging several INSERT queries into one.
Let’s clarify the situation with a simple example. Assume that we have a table tbl with three columns a, b and c. In this table we have two rows: (1, 2, 3) and (4, 5, 6). If we don’t use extended inserts, two queries are necessary to insert the two rows:
INSERT INTO tbl (a, b, c) VALUES (1, 2, 3);
INSERT INTO tbl (a, b, c) VALUES (4, 5, 6);
However, we can use extended inserts to optimize this insert:
INSERT INTO tbl (a, b, c) VALUES (1, 2, 3), (4, 5, 6);
Here we inserted two rows with one query. Of course in this example the gained time is negligible, but with a big table containing a large number of rows, the advantage can be significant.
The problem is that if your table is a very big one, BigDump can’t split these types of queries. That’s why we must avoid extended inserts when we want to use BigDump: we must ask phpMyAdmin (or your preferred tool/method) to export our data in the shape of the first piece of SQL code above, with INSERT INTO in every insert.
The file will then be bigger. However, as we’ll use a script that supports any size we need, size won’t be a problem.
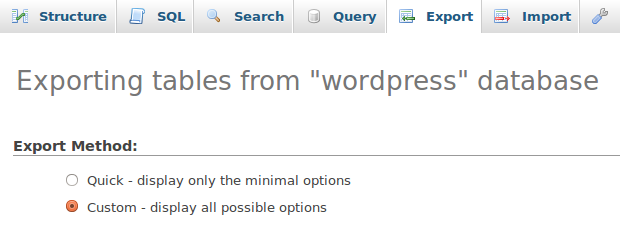
The good news is we can ask phpMyAdmin to avoid extended inserts. To do this, when we export a database we can choose the “Custom” option to customize the way the dump is generated.
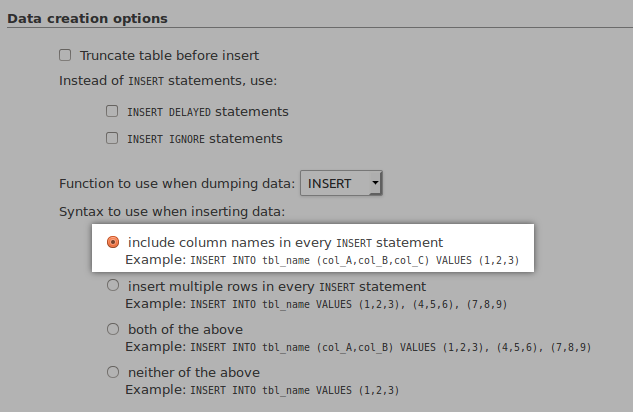
Then, in the “Data creation options” section, we will find the option “Syntax to use when inserting data“. The default value is extended inserts: change it to the first one (“include column names in every INSERT statement“). That way, phpMyAdmin will generate inserts as we see above.
We’re now ready to use BigDump!
Restoring a Big Database with BigDump
Download and Install BigDump
You can download BigDump from the official BigDump website. You’ll download an archive containing a PHP file calledbigdump.php.
You can place BigDump anywhere you want on your computer, in a directory accessible from your web server (for example, I created a special folder named “Tools” which contains some useful tools like BigDump).
Then, you can access BigDump by using its URL (in my example, it’s ).
Initializing BigDump
Before importing our big file, we need to initialize BigDump to allow it to know how to access our database. That can be achieved by editing the bigdump.php file.
The first four defined variables, right after the big comment informing us about the license, are the ones you will need to edit.
Their names are pretty clear: you must indicate in $db_server the server where your database is stored, in $db_name the name of your database and in $db_username and $db_password your login information. These details are the same as what you’ll find inside wp-config.php or any other web application that uses MySQL.
By default, BigDump uses the utf8 charset but you can modify this by editing the value of the variable $db_connection_charset defined right after the ones we just edited.
We’re now ready to import our big file. Just access BigDump by visiting its URL, as described above.
Importing a Big Database Dump
There are two ways we can import a big file. The first one is by using the form BigDump created: you use the “Browse…” button as usual to select your file, and hit the “Upload” button to submit your file. The problem with this method is you are still limited by the upload limit of your server. Moreover, the directory containing BigDump must be writable for PHP.
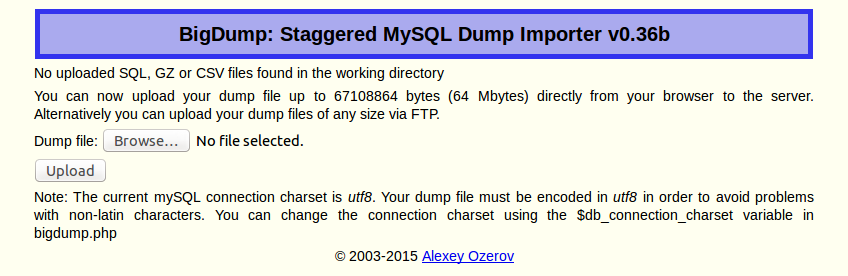
The second method is by directly uploading your file on your server, using FTP/SFTP/SCP for example. Your file must be placed in the same directory of the bigdump.php file.
Once your file is uploaded (thanks to the form or via FTP/SFTP/SCP), it is accessible from the BigDump interface.
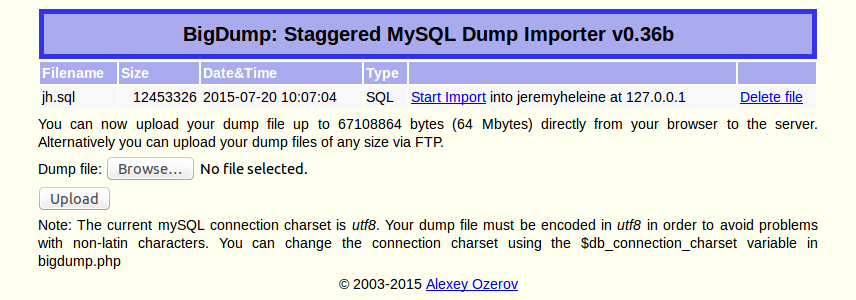
If the folder is writable, you can delete your SQL files directly from this interface once it’s used. To import the file into the database indicated into the variables we edited above, hit the “Start Import” link on the line corresponding to the file you just uploaded.
Then, BigDump will display a new page indicating the progress of the import. All you have to do here is wait for the end of the file to be reached. You can also abort the import by hitting the “STOP” link below the table.
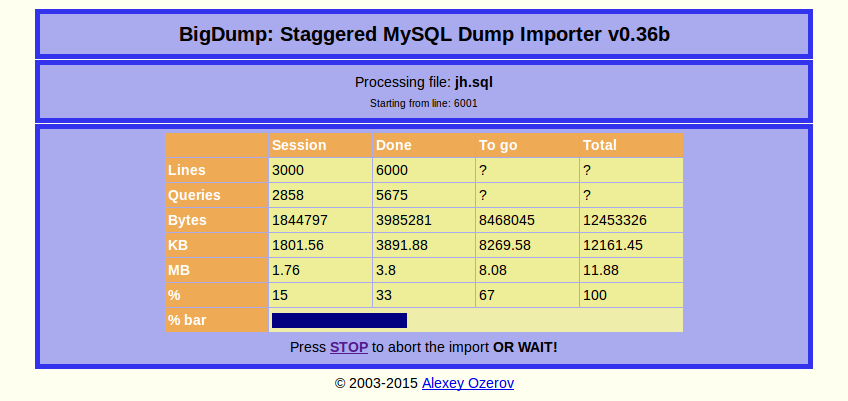
Once the import is finished, that’s it! Your data is imported into your database and you can delete your SQL files. Congratulations, you just got around the size limit when you want to import an SQL file!

WP-DBManager – a WordPress Plugin to Automatically Backup Your Database
We know how to manually back up our WordPress database. And how to restore it, even if it’s huge, thanks to BigDump. However, manually backing up a database is not a fun task, especially if we do it every week, or every day. That’s why there’s a wide range of tools that can automatically do this for us.
Also mentioned in a previous article on WordPress maintenance, WP-DBManager is freely available from WordPress.org. WP-DBManager stores its backups in the /wp-content/backup-db directory and, in some cases, it can’t create this folder by itself. To fix this issue, create this folder and make it writable for PHP.
To create the first initial backup of your database, you can go to the ‘Backup DB‘ entry of the ‘Database‘ menu (which appears with the plugin activation). At the bottom of the page you’ll be able to hit a ‘Backup‘ button which will launch the backup.
You can manage your backups via “Manage Backup DB“. Here you’ll be able to delete old backups, download the ones you want to retrieve or even send them by email.
The section we’re really interested in is “DB Options“, specifically the subsection labeled “Automatic Scheduling“. The first option, “Automatic Backing Up of DB“, allows you to set a time interval for your backups. For example, if you set “2 weeks”, WP-DBManager will automatically backup your database every two weeks. You’ll be able to access these backups from the section we described above, but you can also choose to receive them by email, which might come in handy for some.

In Conclusion
Backing up your WordPress database is important. It contains the data for your website, and without a backup of it, if your WordPress website crashes, you risk losing valuable data.
There are several ways to back up your database: the manual way and the automatic way with WP-DBManager. You can even develop your own tools. If this is the case, then please don’t hesitate to share them in the comments below!
Moreover, with BigDump, you can easily restore your data regardless of the size. In just one click you can restore, without the need to manually split the file.
Leave a Reply
Want to join the discussion?Feel free to contribute!